![Yotruth F150 Seat Covers Set: Create a Personalized Driving Experience - YOTRUTH]()
How to Personalize Your F-150 Cabin in 3 Hours ($400 Total)
A complete F-150 cabin transformation takes 3 hours and around $400. Here's the exact step-by-step, what to buy, and why each piece matters for both your daily drive and your truck's resale value.
The 3 Essentials
Truck personalization isn't about adding dozens of accessories — it's about three core upgrades that deliver 80% of the visual impact and 100% of the practical value:
-
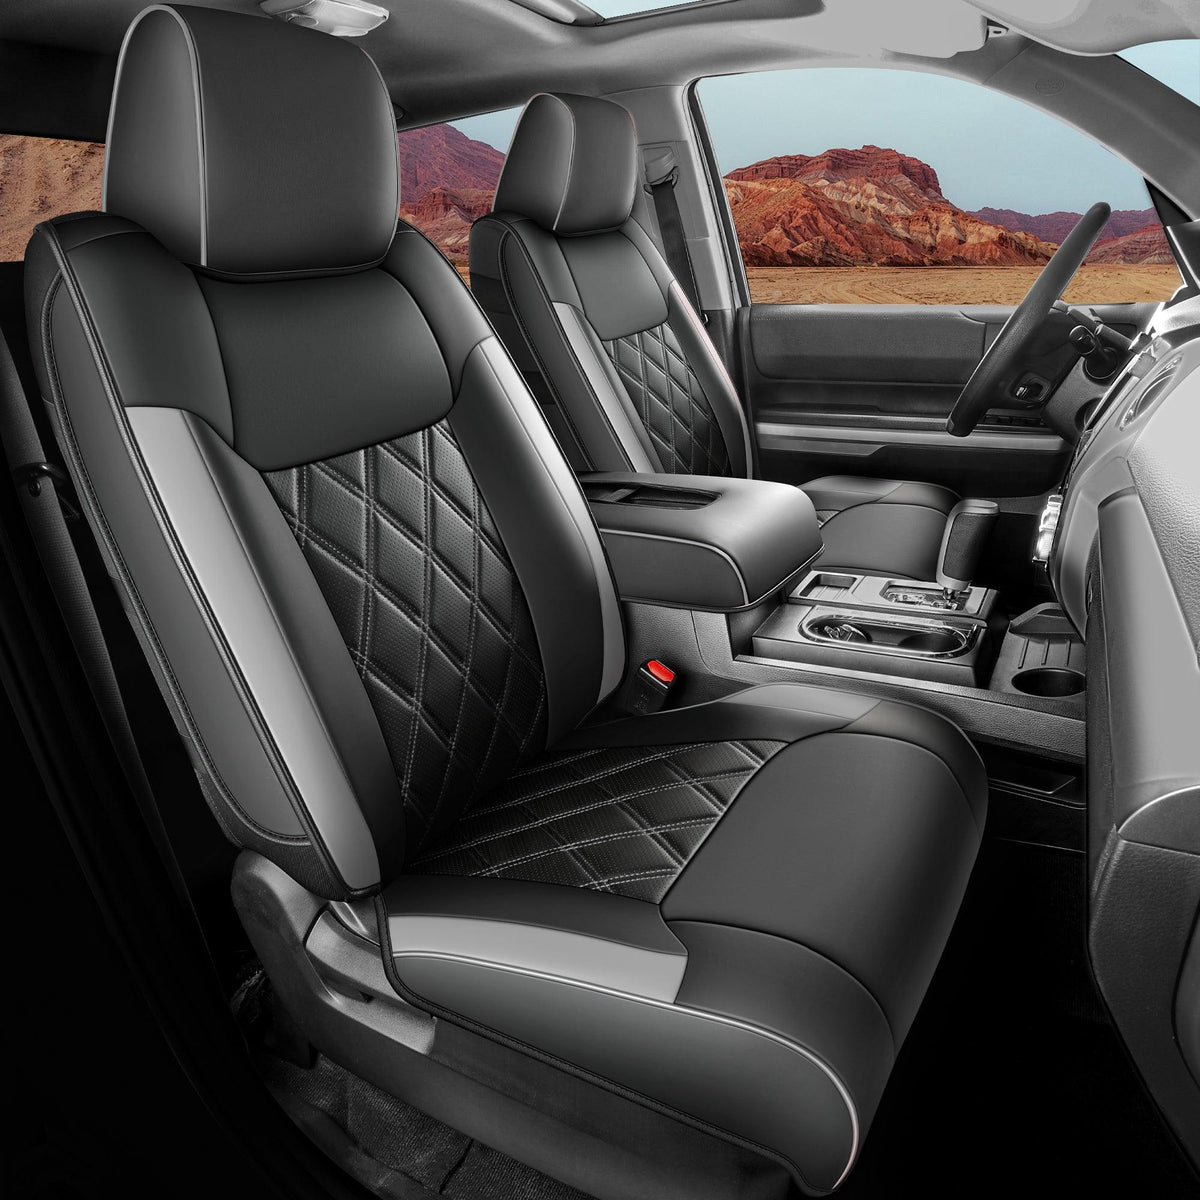
Custom-fit seat covers — the biggest visual change ($150-180)
-
Custom-fit TPE floor mats — protection + look ($110-140)
-
Cabin accessories — mud flaps or cargo liner ($80-120)
Total: about $400 for a 2024-2025 F-150 SuperCrew. Less for older cabs. Time investment: ~3 hours.
Why This Matters Beyond Looks
Three reasons to invest in cabin personalization:
-
Daily comfort — fitted covers feel like factory leather; quality floor mats absorb mud and salt that would damage factory carpet
-
Resale value — independent dealer surveys show "well-maintained" interior adds $800-$1,400 to F-150 resale (and these covers protect what's underneath)
-
Brand differentiation — your F-150 looks like *yours*, not the rental fleet down the street
Step 1: Pick Your Seat Covers (15 min decision)
The big choice: material. Four options for F-150 buyers:
| Material |
Look |
Best For |
Price |
| Faux Nappa Leather |
Premium leather feel |
Daily drivers, family, dealers |
$150-170 |
| Polyester |
Sport / tactical look |
Work crew, summer |
$120-150 |
| Neoprene |
Wetsuit grip |
Outdoor, fishing, beach |
$140-160 |
| Canvas |
Rugged matte |
Construction, ranch |
$130-150 |
For most F-150 owners, Faux Nappa Leather is the safe choice — looks premium, easy to clean, and resists everything from kids to dogs.
Critical: confirm your cab type before ordering. SuperCrew vs SuperCab vs Reg Cab have different rear-seat geometry. Find your fit here.
Step 2: Install Seat Covers (90 min)
Plan for 30-45 minutes per seat row (front pair + rear bench).
-
Park the F-150 in shade or garage. Air ventilation helps if it's hot.
-
Remove headrests — pull straight up, headrest releases vary by year. F-150 typically has 2 release buttons.
-
Pull the bottom cushion forward if there's an access tab (Lariat+ models). Bottom of seat is easier to access this way.
-
Position the bottom cover first — slip over the bottom cushion, work to corners, tuck the front edge under the seat front.
-
Position the back cover — slip over the seat back from the top down. Pull tight at the bottom.
-
Connect straps under the seat — most YOTRUTH covers have 2-3 anchor straps. Loop and click.
-
Re-attach headrests through the cover holes.
-
Check airbag flap alignment on side seats — F-150 SuperCrew has side-impact airbags, the cover has a marked flap that must align.
-
Repeat for rear bench — usually faster (single piece).
For specific F-150 install videos, see our install guides page.
Step 3: Install Floor Mats (30 min)
YOTRUTH custom-fit TPE mats install in under 5 minutes per row. For F-150 SuperCrew:
- Remove factory carpet mats (or whatever's there)
- Lift up any debris (this is the cleanest your floor will be in a year — take a photo for fun)
- Position the new front driver mat
- Press down on retention clip points until you hear them snap
- Verify back edge is flush against the door sill
- Repeat for front passenger
- Repeat for rear bench mat (typically a single piece on F-150 SuperCrew)
The TPE mats also conduct factory heated-floor warmth (Lariat+ models) without blocking — a small bonus.
Step 4: Pet & Cargo (60 min — optional but recommended)
Round out the cabin with at least one of:
-
Mud flaps — protect lower paint from gravel kick-up. Direct bolt-on to F-150 wheel wells.
-
Cargo liner — full-bed protection for the F-150 cargo area. Reduces shifting load damage.
-
Headrest hooks — for grocery bags, jackets, dog leashes
-
Pet hammock — for dog owners; converts rear bench to a contained pet zone
These each take 15-30 minutes. Choose 1-2 based on actual use case.
Tools You'll Need
- Phillips and flathead screwdrivers
- Pliers (for tucking edges)
- A flashlight
- A helper (optional but nice for seat covers)
- Patience for the airbag flap alignment
Total tool investment: $0 if you have any basic toolkit at home.
What You'll Save Long-Term
This upgrade protects three things from wear:
-
Seat fabric and leather — saves $400-800 reupholstering job at trade-in
-
Floor carpet — saves $200-400 carpet replacement
-
Resale value bump — $800-$1,400 according to dealer surveys
Total saved/added: ~$1,400-2,600. Original investment: ~$400. ROI: 3-5×.
Common Mistakes to Avoid
-
Buying universal covers instead of cab-specific — universal "fits all F-150" covers have visible gaps at rear seat. Always specify SuperCrew/SuperCab/Reg Cab.
-
Skipping the rear seat covers — gives an unfinished look. The rear bench is the most visible part for passengers.
-
Forgetting to align the airbag flap — covers without proper airbag accommodation can interfere with safety systems. Use only covers explicitly tagged "Airbag Safe."
-
Installing in extreme heat — covers are tighter when cold. Wait for the cabin to cool before stretching them on.
Bottom Line
3 hours of work + $400 = a completely different F-150 cabin. Visual upgrade, daily comfort, protected interior, higher resale. The cost-to-impact ratio for this set of upgrades beats anything else you can buy for the F-150.
Start with the seat covers if budget is tight. Browse F-150 covers by trim, or use the YMM widget to find your exact set.